Forum Replies Created
-
AuthorPosts
-
in reply to: Errors / warnings after sync #6833
The first error means that the rsync process is not running. Please ensure rsync is installed, running, enabled, and configured as per the PBXSync detailed installation guide.
I suspect that you actually solved the first error, since the second error means that rsync is running! But, the second error means that the rsync.pbxsync.secret file has the wrong permissions. Please modify the permissions of this file as follows:
Quote:
chmod 600 /etc/ rsync.pbxsync.secretAfter that your sync should work.
in reply to: Errors / warnings after sync #6824The first error means that the rsync process is not running. Please ensure rsync is installed, running, enabled, and configured as per the HAAst detailed installation guide.
I suspect that you actually solved the first error, since the second error means that rsync is running! But, the second error means that the rsync.haast.secret file has the wrong permissions. Please modify the permissions of this file as follows:
Quote:
chmod 600 /etc/ rsync.haast.secretAfter that your sync should work.
in reply to: Thank you! What a team #6823I’ve passed along your thanks to the entire account team. We think we have a pretty exceptional group of people here, and its great to hear our customers feel the same way.
BTW Steve is our CTO, and he really knows his stuff. Steve is personally involved in every large project, and also does quality reviews of smaller projects as well. Given the size of your project Steve (and lots of behind the scenes team members) gave the project lots of attention.
The account manager will follow up by phone as well, we’d appreciate a testimonial for the Telium website.
in reply to: Test email alert from node #6822At this time HAAst does not have this capability, but a feature request has already been submitted. However, if you are concerned about connectivity between the HAAst node and your SMTP server, or SMTP credentials, then we can help you diagnose this.
From the HAAst node perform the following steps:
- From a command prompt type “telnet hostname 25”. This connects telnet to port 25 on the server with the name or IP ‘hostname’. Replace ‘hostname’ with the name of the SMTP host you specified in your haast.conf file, and replace 25 with the port you specified in your haast.conf (in the [smtp] stanza)
- If the TCP connection fails, then you have confirmed a network/routing problem
- If the TCP connection is established, telnet responds with the message “Connected to SERVERNAME and Escape character is’ ^]’.”
- Now you can send an e-mail via SMTP protocol. You must use a recipient address for which the connected mail server is responsible (or the message will be refused/discarded)
EHLO test.example.com

MAIL FROM:

RCPT TO:

DATA

Subject: Testmessage from haast node 1

(Blank line, press Enter again)

This is an alert!

(Blank line, press Enter again)

.

QUIT - The SMTP server should respond that your message has been accepted. Now wait at the receiving end for your message to appear.
The above assumes that the SMTP server does not require encrypted authentication. If you need help with encrypted SMTP authentication (or session) please contact support@telium.io for further details.
in reply to: Can HAAst monitor proprietary hardware / software? #6818Yes! The Commercial Unlimited edition of HAAst has the ability to use custom sensors that you (or we) can create. So if you already have a command line tool that reads the hardware or software health then a simple BASH script will allow you to feed that health data into HAAst. HAAst can then consider that data within its node monitoring and failover (or take other actions) based on the health of your proprietary hardware/software.
If you prefer, Telium can create a high performance sensor (written in C/C++) which connects to any API’s you make available. If you prefer that we would develop those sensors through Telium Professional Services.
in reply to: How long to get a license #6821License requests go into the general support queue, which means response time for your license will match our general support response times. Our typical response time is 20 minutes, but during times of high demand it may extend as far as 4 hours. (By hour 4 engineering staff are being moved to support desks – so this doesn’t happen often).
If you are a Telium certified OEM/VAR partner then your requests will move to the head of the support queue. If you need USB Dongles sent in advance we recommend you provide at least 2 weeks notice.
in reply to: How long to get a license #6828License requests go into the general support queue, which means response time for your license will match our general support response times. Our typical response time is 20 minutes, but during times of high demand it may extend as far as 4 hours. (By hour 4 engineering staff are being moved to support desks – so this doesn’t happen often).
If you are a Telium certified OEM/VAR partner then your requests will move to the head of the support queue. If you need USB Dongles sent in advance we recommend you provide at least 2 weeks notice.
in reply to: FreePBX access denied to SQL error on one node #6820The problem most likely was created by changing the FreePBX database username/password on one node and not the other. Changing the FreePBX database username/password does two things: 1. it updates the /etc/freepbx.conf file, and 2. it updates the ‘users’ table in the MySQL ‘mysql’ database.
So although you may be syncing the ‘freepbx’ database between nodes, you are not syncing the ‘mysql’ database between nodes. And you should not try to synchronize the MySQL ‘mysql’ database (which holds the schema as well as user info), unless you are a DBA and really understand what you are doing!
The solution to this problem is very simple:
- Copy the full MySQL database from the working node to the problem node; or,
- Reset the FreePBX user password on the problem node to match the working node; or,
- Don’t sync the freepbx.conf file and set the two nodes to have different passwords
To avoid this in the future either:
- set the FreePBX MySQL user password identically on both systems; or
- leave the default password; or
- don’t synchronize the freepbx.conf file; or,
- sync the ‘mysql’ database (but you have to be sure you understand the implications before doing so) – we don’t recommend this
So the cause and solution to this problem reside completely within FreePBX (HAAst has not malfunctioned in any way).
The above is a general guideline, not a detailed instruction manual on how to use and setup AWS, nor is it an instruction manual on networking. Setup and configuration of multi-homed networks is where most users get stuck. The Telium support group can offer assistance for specific problems, but we cannot offer instructions on the basics of networks, multi-homing, routes, ARP, AWS EC2, EIP, ENI, etc.
Keep in mind that the support team can help you install HAAst on top of your platform, but you need to have a working Asterisk/FreePBX implementation with properly configured networks before Telium support staff can begin. (As a matter of policy Telium support staff cannot change NIC configurations, routes, rules, etc. on your nodes)
First of all, AWS Lightsail has hidden access to some features that you will need to make this work, so you will instead need to setup a couple of EC2 instances. Since you want to share a VoIP NIC (shared IP) between nodes, your two nodes must reside in the same region but can reside in different Availability Zones (AZ’s).
Since (in most configurations) each node will have two IP addresses, and each address cannot be in the same subnet as the other (basic routing limitation), you must create 2 subnets within your VPC. If you want your two nodes to reside in separate AZ’s, then you will have to create 2 subnets per AZ (since subnets cannot span AZ’s). You might have to manually ad private IP(s) to NIC(s) in Linux depending on your design. You must then setup a security group encompassing both nodes, which allows SSH traffic into the management IP, and VoIP traffic in/out of the VoIP IP.
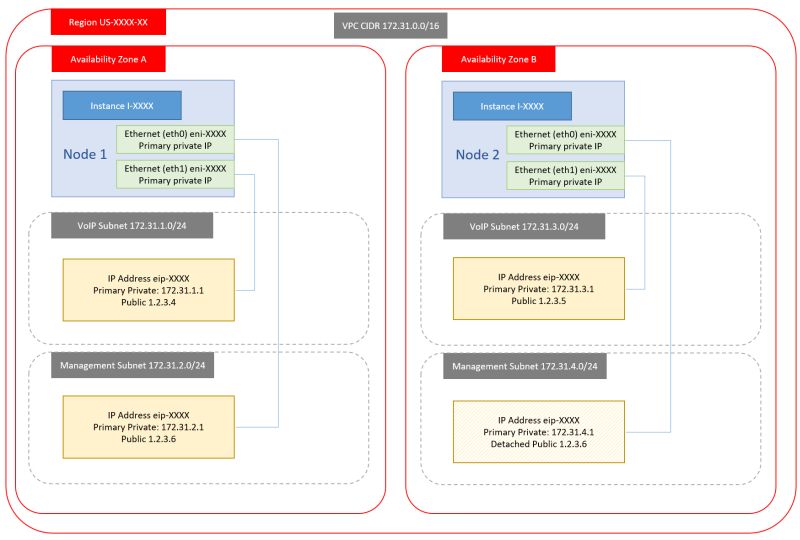
And finally you have some choices around how many NIC’s and public addresses your want in your setup. The more you want, the more complex the setup. We have created four basic designs you can chose from (but there are more):
- Dual NIC, Dual public IP
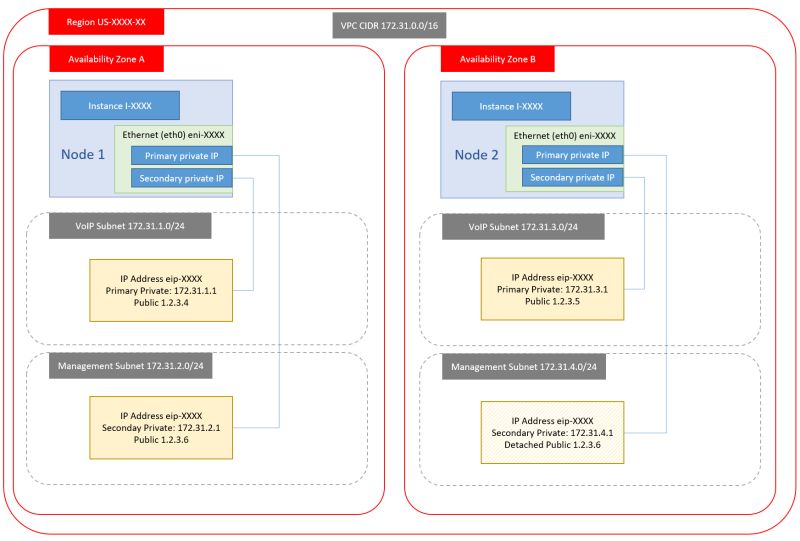
- Single NIC, Dual public IP
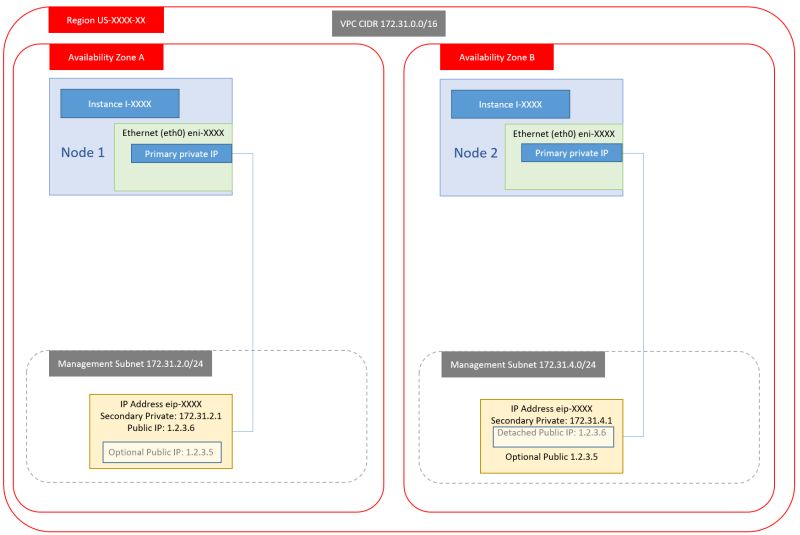
- Dual NIC, Dual Private IP, Single public IP
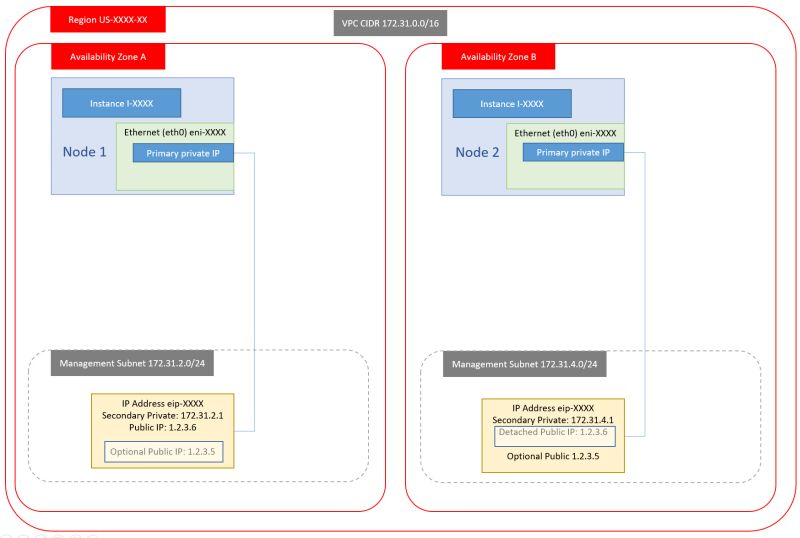
- Single NIC, Single Private IP, Single public IP.
The first option is the one we normally implement as it is easy to manage, separates traffic across NIC based on traffic type, avoid loss of management connection in case of VoIP IP issues, etc. But this is also the hardest to implement for AWS EC2 novices. As well, setting up routing rules can be a challenge for someone who doesn’t do network management as part of their job. We also prefer only a single VoIP IP (not dual public VoIP IP’s).
The fourth option is by far the simplest (almost trivial) to setup and you won’t have to worry about routing rules, but you will NOT have external access to the management IP’s of your nodes. To work around this you would either have to create a VPN into your VPC, or setup a third host whose sole purpose is to allow SSH relay to the internal hosts (management IP’s). We can also swap public IP’s between nodes if this makes life easier – to ensure continued direct external access to both nodes (but this is painful to use during setup).
Here’s an overview of the four designs:
1. Dual NIC, Dual public IP
2. Single NIC, Dual public IP
3. Dual NIC, Dual Private IP, Single public IP
4. Single NIC, Single Private IP, Single public IP
 in reply to: USB Dongle in VMware ESXi #6812
Once you have received the USB dongle(s) containing your license,
1. Plug each dongle into the appropriate physical machine. (The dongle will have a tag attached showing the machine name, in case you have multiple dongles).
2. From the VMware console edit the virtual machine, and add a new USB device:

3. Select the device name which should be something similar to “Phillips Elite”, and click save. (On some occasions you have to shut down and restart the VM for the hardware to be added).
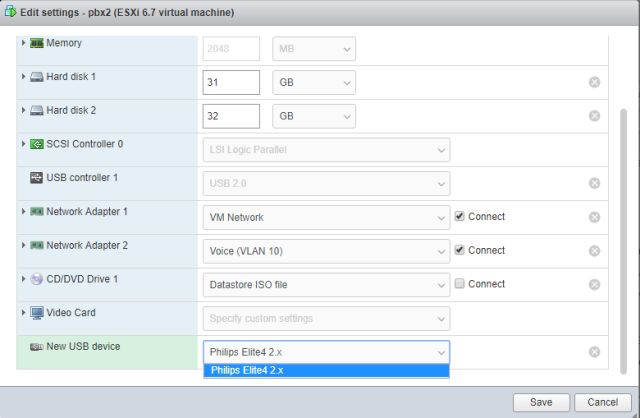
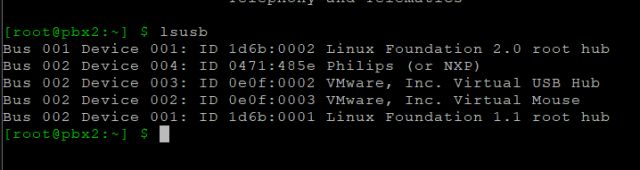
4. From the VM’s command line, confirm in Linux that the USB dongle is present using the “lsusb” command. Notice the Phillips (NXP) device is present – that is the USB dongle.
5. Telnet to the local PBXSync instance and issue the “license usbdongle” command and follow the steps presented on screen.
-
This reply was modified 6 years, 2 months ago by
WebMaster.
in reply to: USB Dongle in VMware ESXi #6814Once you have received the USB dongle(s) containing your license,
1. Plug each dongle into the appropriate physical machine. (The dongle will have a tag attached showing the machine name, in case you have multiple dongles).
2. From the VMware console edit the virtual machine, and add a new USB device:
3. Select the device name which should be something similar to “Phillips Elite”, and click save. (On some occasions you have to shut down and restart the VM for the hardware to be added).
4. From the VM’s command line, confirm in Linux that the USB dongle is present using the “lsusb” command. Notice the Phillips (NXP) device is present – that is the USB dongle.
5. Telnet to the local HAAst/SecAst instance and issue the “license usbdongle” command and follow the steps presented on screen.
-
This reply was modified 6 years, 2 months ago by
in reply to: Asterisk 16 support #6829PBXSync fully supports Asterisk 16.
in reply to: Asterisk 16 support #6813Asterisk 16 has numerous architectural changes that impact connected products. Our development team has implemented Asterisk 16 compatibility, but will not release thr code until Asterisk 16 has stabilized, and we see companies implementing Asterisk 16 in production.
As of March 2019 Asterisk 16 is not widely placed into production yet, and so we advise you to NOT upgrade to Asterisk 16 at this time. Since you are a registered HAAst user you are welcome to download a pre-release version of HAAst which supports Asterisk 16.
Asterisk 16 has undergone some significant changes since initial release, and until the product has stabilized we do not recommend placing Asterisk 16 in production.[/i][/color]
in reply to: Asterisk 16 support #6810Yes – you will need HAAst version 2.5.0 or later for Asterisk 16 support
-
AuthorPosts